Intro
The Appointments module will easily allow you add an appointments booking engine to your App. The App manager will be able to create multiple stores, categories, services and providers. It’s also possible to define store opening and closing timesand create a specific schedule for the providers. Lastly, so that the App Manager can also take appointments over the phone and from walk-ins, through the web front-end interface, it’s also possible to add appointments manually.
The Appointments engine also send push reminders before each appointment. The default reminderis set for 1hr before the appointment but the user is free to adjust according to the individual needs. This module requires the Individual Push Notification Module in order for the send the alert reminders. The Appointments module has been connected to the Progressive Loyalty Card module ,this means that loyalty points can be accumulated automatically with every booking that is made.
Setup
You’ll need to access the Settings tab in order to begin this process:
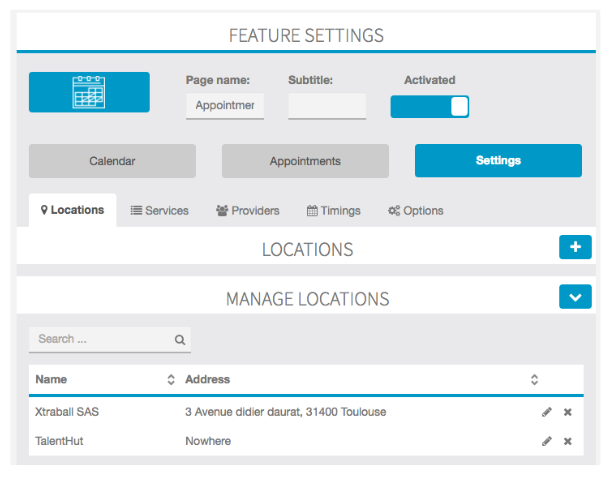
A. Location
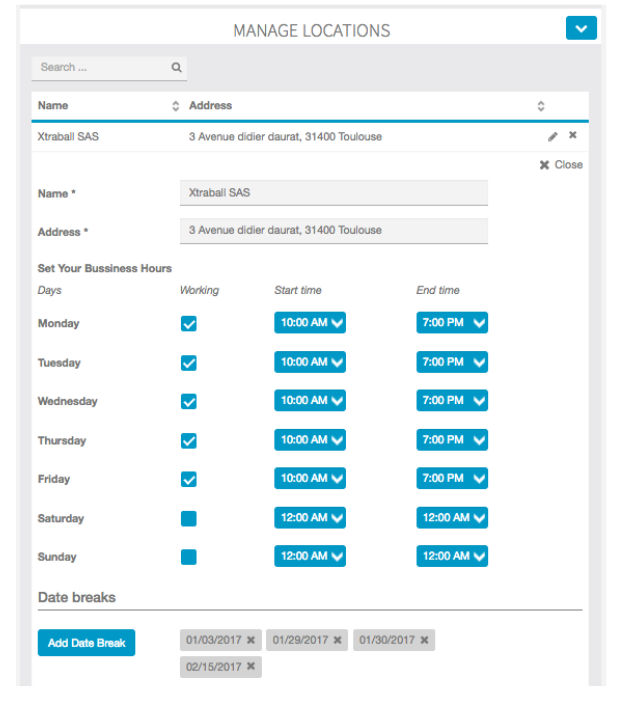
The first step is to create the location for your retail outlet. You can have more than one outlet on each App. If you only have 1 store location, the user will not be presented with the store selection during the booking process. You’ll needto add the Name of the location, the address, and set the business working hours. If you close for lunch, you won’t define it here. When you add the providers, you’ll be able to define the lunch period separately for each one of them. Lastly, you’ll be able to define if the store is closed on a specific day, like December 25, and save:
A. SERVICES & CATEGORIES
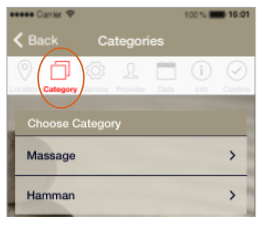
The secondstep is to create categories of services. This will allow you tocategorize the services and to show the user a more organized list of the services that are provided. If you only have 1 category, the category tab will not be shown during the booking process. The user will be taken to the services tab immediately:
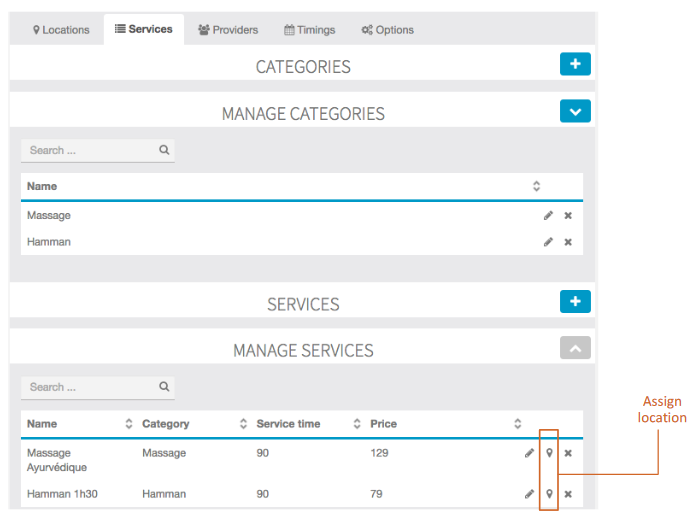
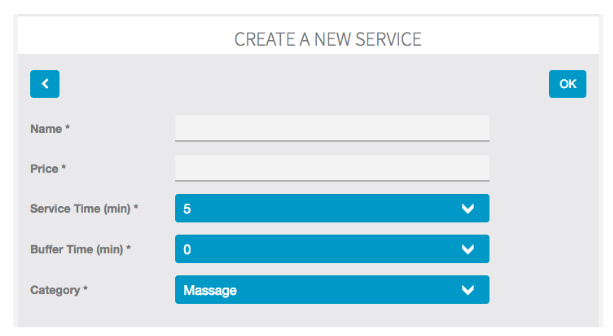
Once you have created the categories, you can move on to creating the services. You’ll need to define a name, price –don’t worry about the currency symbol, it will be obtained from your App’s currency settings -, service and buffer times, and the category. The buffer time is the time that is required between appointments, it can be set to zero:
Once you’ve saved the service, you’ll need to define where that service is available. It could be there are multiple stores and the service is only available at one location. You’ll Assign location need to repeat this step for all the services that you create.
B. PROVIDERS
The first step is to add the providers and to associate the providers to the locations and services . You’ll need to create a name for the provider, add a phone number and an email address. Optionally, you can add a description for each provider. This is enable on the App an information icon below the provider’s name during the booking process. Each time an appointment is made for a specific provider, an information email canbe sent. You’ll also be able to add a picture for each provider, if it’s not added, a default avatar will be shown.
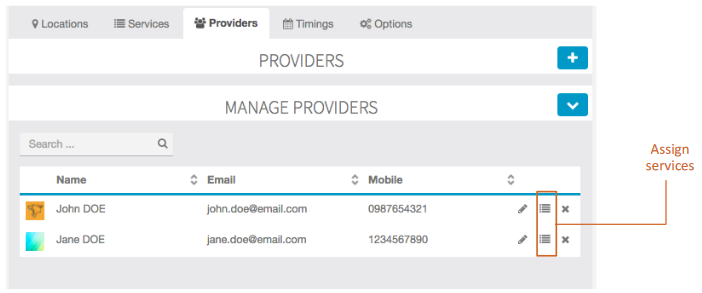
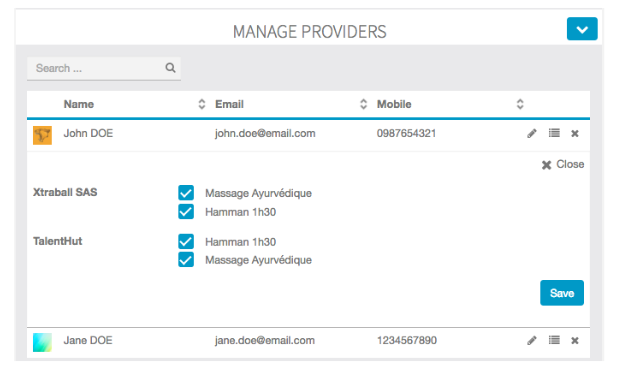
Once you’ve addthe provider, you’ll need to assign the services to that provider.Please note that if you have more than one location and the provider works at both locations, you’ll need to assign the services to the provider at each location.
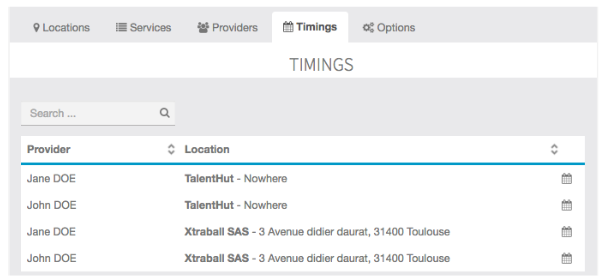
C. TIMMINGS
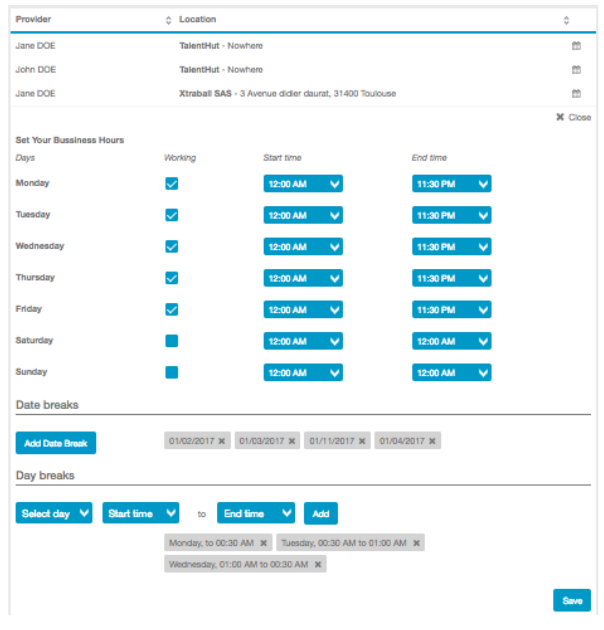
The last step is to define when the provider will be available to work. In case the provider works are more than one location, you’ll need to define the timings for each location.
When defining when the provider is available to work, you’ll need to define the start and end times. You can also add a day break, for example, in case the provider doesn’t work on specific date due to a holiday or doctor’s appointment. The lunch or any other breaks can also be added from this screen. These breaks will be excluded from the availability on the user’s booking interface.
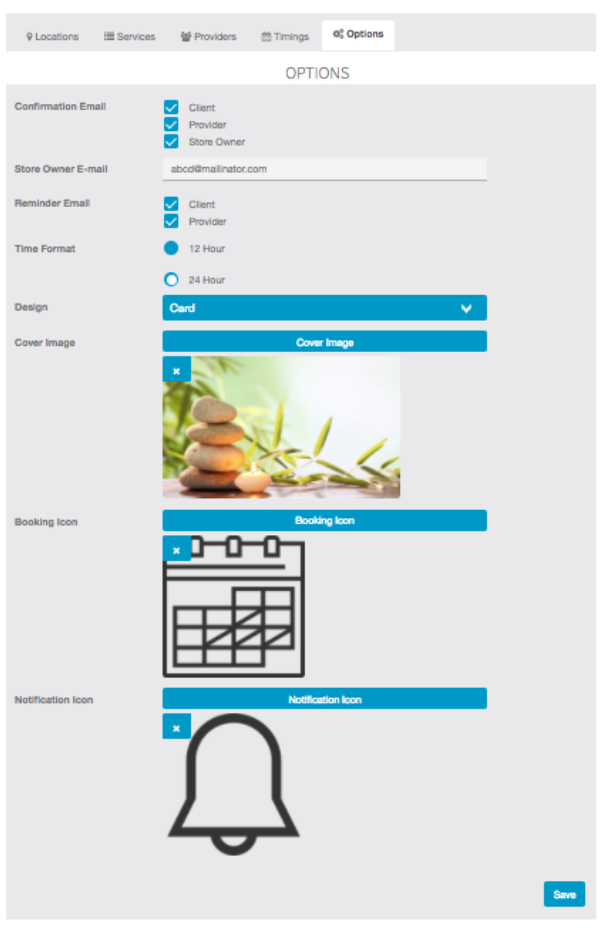
E. OPTIONS
From the options menu you’ll be able to adjust some module design options and customize the icons used.You’ll get to decide who gets emails when bookings are made and also if you want to send reminder emails in additional to the push notification alerts.
F. CUSTOMIZATION
The color of the active icon during the booking process can be customized individually by using the SCSS code below:
.tab-item-active > .icon,
.tab-item-active > span.tab-title {
color: #ff0000 !important;
}
Managing Appointments
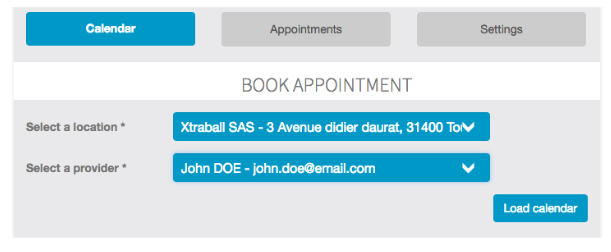
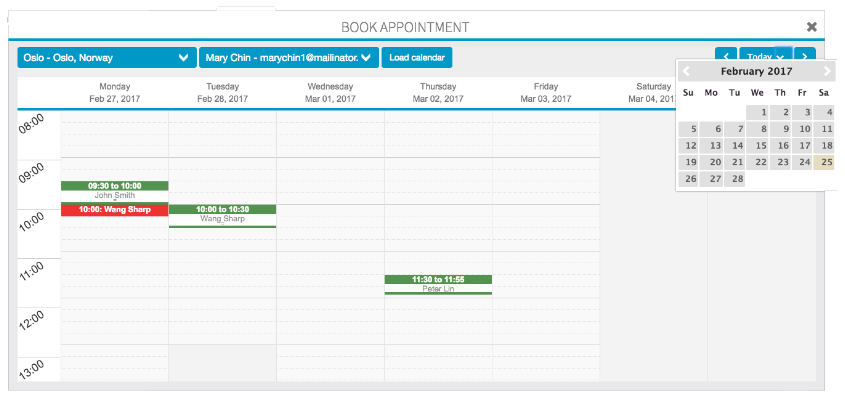
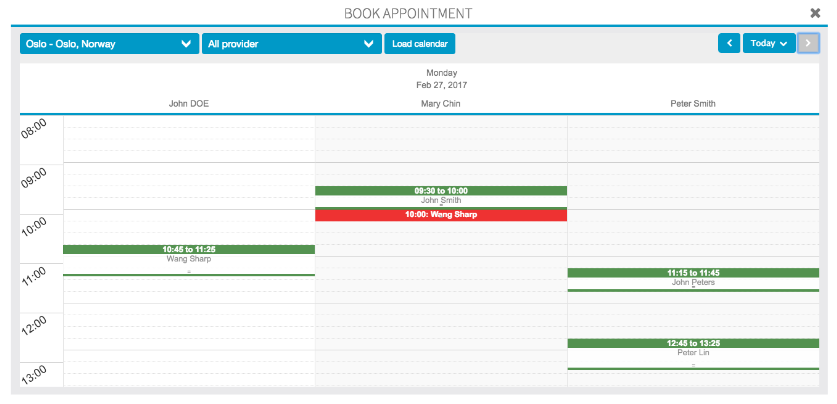
Appointments can be managed from the Calendar interface. The store manager will need to select the location and provider that needs to be managed. Once that is selected, the calendar can be loaded with that criteria. Should the store manager need to change location or provider, it can be done using the pull-down menus. The store manager can obtain a view of the availability of all providers by switching to a daily calendar view. That can be attainedby selecting All Providers from the pull down menu. The calendar view will switch to daily automatically.
A. ADDING AN APPOINTMENT
The store manager can add an appointment that is received over the phone or from a walk-in customer from the Calendar View. An appointment can be easily added by clicking on the desired date and time. A new window will appear wherethe store manager will be able to select the service, the customer and the desired time.If there any special appointment requirements or details, these can be added to the Notes field. Once the new appointment is saved, aconfirmation email will be sent to the customer and to the provider.
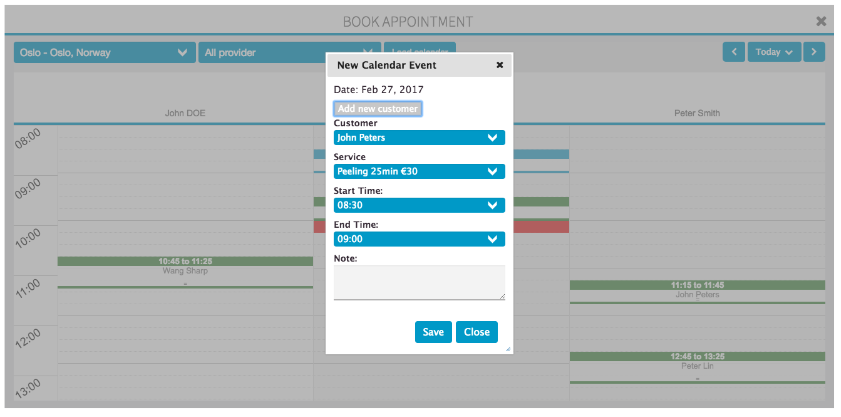
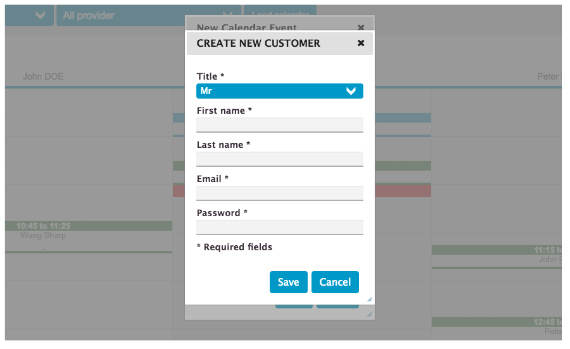
If the store owner is creating an appointment for a new customer, a new customer account can be created without leaving the calenda. An email will be sent to the customer with the email and password so that the App can be accessed.
B. CANCELLING AN APPOINTMENT
The customer cannot currently cancel an appointment. This will be enabled in a future release when booking cancellation policy is supported. Currently, if the customer needs to cancel an appointment, the store owner will have to be contacted. Cancelling anappointment can be done by clicking on an appointment from the Calendar View and pressing the Voidbutton. Voiding an appointment will maintain the appointment on the Calendar and on the customer’s front end. If you need to completely delete an appointment, the Deletebutton should be used instead.
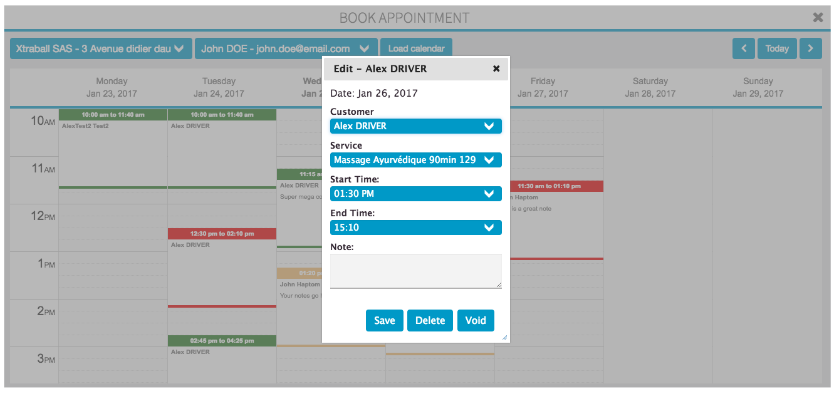
C. EDITING AN APPOINTMENT
An appointment can be changed in two ways. If only a change in date/time is required within the same week, the store owner can just drag the desired appointment and drop it on the new date/time. Please make sure that the destination date/time is available, i.e., store is open and the provider is available on that day/time. If any of the criteria before fail, the drag/drop functionality will not work. The second way to change an appointment is to click on it as if you are going to edit it. Once the appointment edit pop-up opens, you’ll be able to change the appointment details.