Our Market Place feature integrates with our Commerce Pro feature (Shopping Cart). Together they enable our customers to create a market place module that enables app users to sell their products/services inside of your app. App users would be able to create a store in your app, add their business location, contact info, products, descriptions, images, etc directly from their phone.
In addition to the above options, there is also a QR Code feature that enables each business owner to have a QR Code that would link to their business in the app. The Market Place feature also have an option that enable payments for products to go directly to you the app owner, or the payments can go to each respective business owner.
See the instructions below for setting up Commerce Pro:
GETTING STARTED
1) Log into your App Manager and select your app.
2) Click Features from the left-hand-side of the screen (or the middle of the screen).
3) Click Market Place (or whatever is the name of your Market Place page). It’s important to note that you must have the Commerce Pro feature installed to use the Market Place feature. It will not work with one of the other commerce features.
SETUP
Setup of the Market Place feature is very simple.
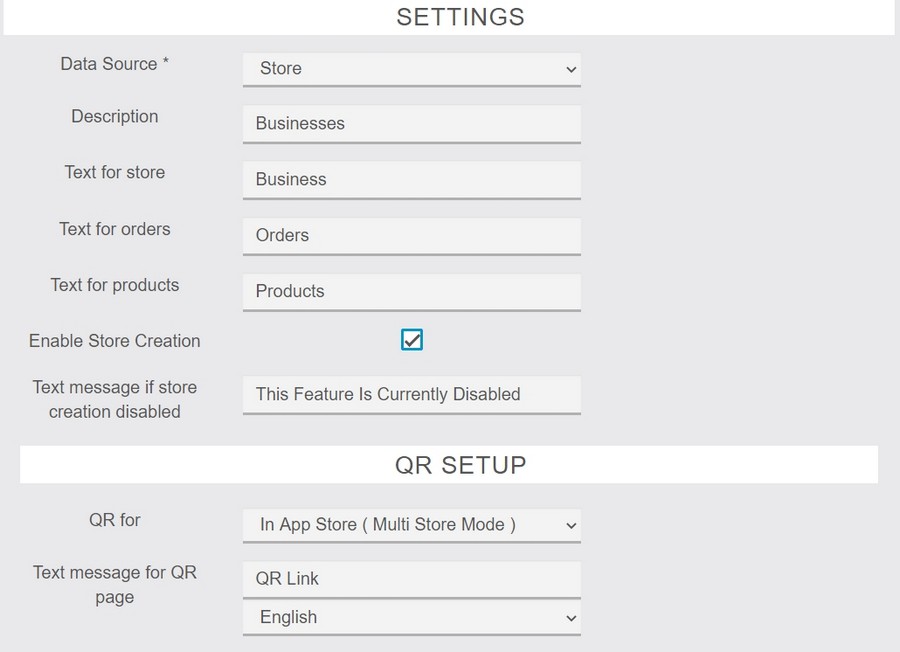
1) Data Source – This is where the Market Place features and options will come from. Select Store to have them come from the individual Store or Commerce Pro to have the options come from your main Commerce Pro settings.
2) Description – The name that will be displayed on the main Market Place page.
3) Text for store – The text to use to identify each business (ex: Store, Business, etc).
4) Text to for orders – The text to use to describe orders.
5) Text for products – The text to use to describe products.
6) Enable Store Creation – Allow app users to create a business in your app or not.
7) Text message if store creation disabled – The message that app users will see if you disable the business creation feature.
8) QR for – When an app user scans the QR code, select where they will be redirected to:
a) In App Store (Multi Store Mode) – The app user will be taken directly to the respective business page.
b) App Store Link – The app user will be taken to the main page of your Market Place in the app.
c) Web Store Link – The app user will be taken to the web store for your Market Place (not recommended at this time).
9) Text message for QR page – The text and language to display for the QR option.
10) Save – Save your settings.
NOTE – For additional settings, see the Settings page in the Commerce Pro feature.
IN THE APP / ADDING A BUSINESS
1) Creating A Business – While in the app, go to the main Market Place page and click the Create Business button to add a new business. Depending on the settings that you selected, your button may some something like “Create Store”, etc.

2) General Business Information – Next, complete all of the required fields for your business (name, address, etc).
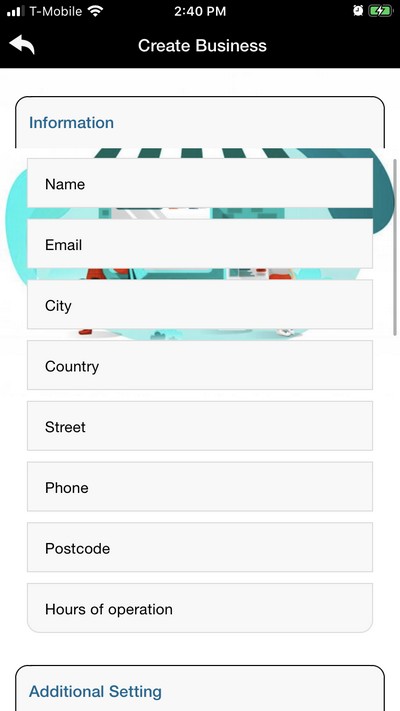
3) Additional Information – Add additional information for your business such as your slogan (Sub Title), Description, and Coupon option, and whether or not your business should be displayed on the map.
In addition, you can limit the hours of operation for your business by adding a Schedule. For example, Monday 10:00 am – 4:00 pm, Tuesday 9:00 am – 5:00 pm, etc.

4) Order Options – Next, add the options that will be available for the app user when they’re placing an order.
Note: For now, disregard the “Charge from customer bonus” option. This feature will be removed in the next update.

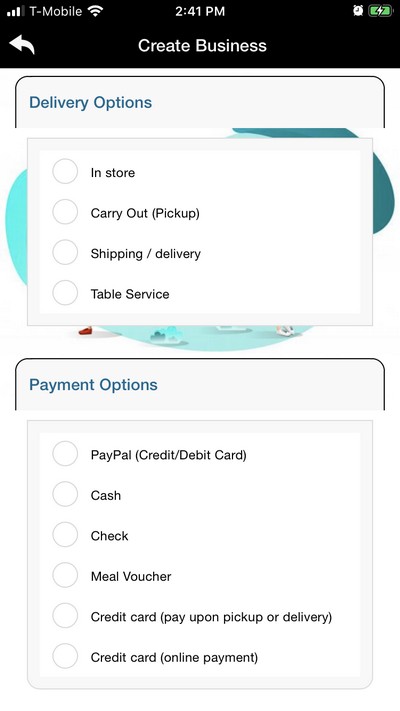
5) Delivery / Payment Options – Select the Delivery and Payment options that are available to the customers when they’re placing an order.
ADDING PRODUCTS / SERVICES
1) Add A Product – To add Products or Services to the business, click the Manage Products button when on the main Market Place page.

2) Product Information – Add the information for product or service.
a) Name – The name of the product or service.
b) Description – Provide a description of the product.
c) Tax – Select the amount of tax that should be added to the order for the product. The available options are set in the Tax section of Commerce Pro.
d) Price (without taxes) – The price of the product.
e) Available Stock – The quantity available of the product to sell. Product quantity management is set in the Settings of Commerce Pro.
f) Min Order Qty – The minimum of the product that must be selected when the app user place an order (This setting is normally 1).
g) Max Order Qty – The maximum quantity that an app user can select when placing an order.
h) Add An Image – Add an image for the product. You can select an image already saved on your phone or you can take a picture of the product to use.

i) Formats – If you product use various options (ex: colors, different sizes, etc), select the Formats option.
After adding a Product, you can add an additional product or edit an existing product simply by going back to the main Market Place page and clicking the Manage Products button again. You’ll then see all of the products previously added.
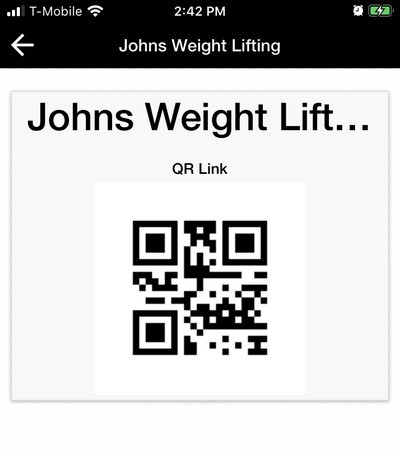
MANAGE QR
To bring up the QR Code for the business, simply go to the main Market Place page and click the Create Business button. You’ll then see the QR Code.
Scanning the code would take app user to the business page in the app, the main Commerce page, or the web page – depending on the settings made (as indicated earlier).